
 Always Ready, Dual Flash Stands
 Aux Sync Jack Mods - Flash Units
 Hot Shoes and
Other Couplers
Hot Shoes and
Other Couplers Lens Mounted & Other Triggers
 Misc Custom
Connections / Projects
Misc Custom
Connections / Projects Off Camera Cord Mods
 Plugs, Jacks, Hardware, Repairs
 Pre-Trigger &
Motor Drive Cables
Pre-Trigger &
Motor Drive Cables Sync Cords, Other Interconnects


 CP1033c:


As most everything on this site is a custom item, many of the things in this post also appear in other areas. Should you see something of interest, but wish it were just a little bit different, send me a note to discuss it, as many times that's where the next picture will come from!
--------------------------------------------------------------------------------
A(***) Horizontal Flash Mounting Bracket (HFMB)
PJ1001 3-25-10

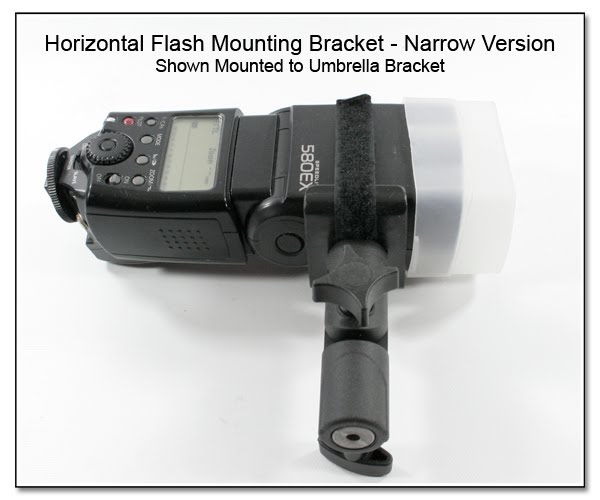
There are many ways to mount a flash unit for shooting into or through an umbrella, just as there are many ideas on which way is the absolute "best". If the decision is to have the flash turned on the side as a way of presenting the smallest (non-obstructive) profile to the bounced light coming from the umbrella, it is mechanically a bad choice to continue to use the foot assembly of the flash for primary
 support, as this presents a rather large moment arm extending out from a small area, and is prone to breakage. Supporting the flash at or near the center of gravity is always the safest way (each moment arm is then half the previous, and each is in opposite directions, balancing the forces), and these images show a new, lightweight,
  easy to use, Horizontal Flash Mounting Bracket. Click on any of the images to enlarge in a new window, and you can see the details pretty quickly. Using the Standard Locking Mounting Foot (9/16 inch) will provide both a bottom threaded insert, a mounting foot to fit in any standard shoe, and a Locking Ring. The Low Profile Mounting Foot (5/16 inch) has no lock mechanism, and
  is being held to the bracket by a single screw (top down). The foam cushion pad can be removed to change out the mounting foot, and then the Horizontal Flash Mounting Bracket can be screwed directly onto an umbrella adapter from the top down (see next image). The pan head screw can then be covered by one or two layers of the soft cushion foam for a seamless and ultra low profile mounting. The Horizontal Flash Mounting Bracket is attached to the Lumopro LP633 Umbrella
  Adapter using 2 screws as a way to prevent rotation. The optional Thumbscrew is also seen in the image as one way to adjust the actual flash angle. When using a standard umbrella adapter or other mounting device that accepts the standard "spigot", the Horizontal Flash Mounting Bracket is best attached using a pan head or flat head screw through a 1/4 inch hole into the "spigot", as seen in the image just below.
 Note: Not all umbrella adapters have an exact 10 degree up angle of the umbrella hole. See the posting about the V Notch and Hole Angle issues just below for a discussion of this issue.
 Since just about every flash has a different physical profile, and the exact position for mounting this bracket vary with the individual photog, the best way to adjust the flash angle (with espect to the bottom of the foot plate) is by adding additional small sections of foam to the front or back of the bracket. In this image below, the same bracket is used for both the 580EX and the 550EX, and extra padding is used only for the 580EX to adjust the flash
  angle. The other adjustment method is to order the bracket with the Flash Angle Adjust Screws, which adds $10 to the base cost, as detailed in the Cost and Details secion just below.
 The next 3 images show the newly modified version of the Horizontal Flash Bracket, where the width of the base and side flanges have been adjusted to allow most flash units to fit properly. The optional Nylon Adjusters ($10 additional) can raise the back end of the flash if this is desired, although it is
probably not necessary. As before, a variety of mountings are possible, from the Standard Locking Mounting Foot, to the Low Profile Mounting Foot, to the Direct Attached Spigot, to the Direct Attached Lumopro LP633. The Horizontal Flash Bracket can also be left attached to the flash for a quick deployment when either of the Mounting
 Feet are being used, or the Horizontal Flash Bracket can be left attached to a spigot or umbrella adapter, also for a quick deployment. The next set of images shows the Double Wide Horizontal Flash Bracket, where 2 flash units sit side by side in the single bracket.
The newest style of the HFMB's is just 0.25 inches narrower than the previous version (image below), but holds just as securely, allows
 better access to the controls, and an easier positioning of the different flash units within the bracket itself. The same mounting options as shown above are available, including the Standard Locking or non-Locking Mounting Foot, as well as the Spigot, and the umbrella adapter shown here.
(***)V Notch and Hole Angle in Umbrella Adapter:
PJ1096 (8-5-11)
 Many of the umbrella adapters are coming through (under various names), but without the "V Notch" in the umbrella hole which helps to secure shafts less than 10 mm (3/8 inch) in diameter. I will add this "V Notch" to any of the previous umbrella adapters for just $5 + S/H, or to any umbrella adapter you already have that did not come from me for just $10 + S/H.
 It is important to note that many of the umbrella holes from various distributors are not drilled at exactly 10 degrees up angle from the horizontal. They seem to be anywhere from 6 to 9 degrees up angle (see Umbrella Hole Angle Measuring Device). The Manfrotto 026 version, as an example (below), has a much steeper Umbrella Hole Angle, but
  the hole is FURTHER AWAY (vertically) from the top edge of the umbrella adapter (by the length of a standard spigot). The other crucial measurement is the Distance of Convergence, how far out in front of the umbrella adapter does the up angle of the umbrella hole meet up with a line drawn horizontally from the top edge of the umbrella adapter. While it appears that this Distance of Convergence is greater with the Manfrotto than with the Lumopro, slight differences are bound to exist for just about every version of each of these adapters due to the slight inconsistencies in both angle drilling, machining, and measuring.
If this is a critical angle (or length) for your needs, you should get the Flash Angle Adjustment Screws ($10 Single, $15 Double) to allow for a variable adjustment, or request and use extra foam strips to raise the back of the flash unit, or have me adjust the actual mounting of the HFMB on the umbrella adapter to assure a 10 degree up angle of the hole with respect to the HFMB. It is $15 to adjust the top of the umbrella adapter so the relative angle is 10 degrees, or whatever angle you wish to have.
A1(***)Review and Further Information:
See a review about this Horizontal Flash Bracket in Rob Galbraith's Digital Photography Insights, click here (will open in a new window).
From a very satisfied customer:
Hi Michael,
The HFMB arrived today. After quick testing I must say it's even better than I imagined! It's tiny and light but sturdy, and it produces a very nice symmetrical lighting pattern with dense center and pleasant falloff even from an ordinary (non-para) silver umbrella...
Thanks a ton for such a genius product and super service! I'll be recommending you to anybody who will listen :)
AK
A2(***)Costs and Details:
The Horizontal Flash Mounting Bracket can be ordered with the Standard Locking Mounting Foot (9/16 inch height) for $40, or the Low Profile Mounting Foot (5/16 inch height) for $40 or the Direct Attached Spigot for $40. The HFMB can now also be ordered with the Custom Cushioned Solid Aluminum Handle (CP1104C
CP1104C:
Horizontal Flash Mounting Bracket
Double Wide with
Cushioned Aluminum Handle), which starts at $75 in addition to the cost of the HFMB. (To actually "Order", send me an e-mail listing the items you want, then pay upon order confirmation via PayPal.) Additional S/H sometimes applies when the spigot or umbrella adapter is ordered due to the larger box needed. If the Spigot is not assembled to the Bracket, these items can be sent in a padded envelope via First Class Mail. When fully assembled, shipping is by Priority Mail in a box.
The Conversion Bushing ($5 PJ1013a

PJ1013a:
Spigot,
Conversion Bushing,
and Threaded Studs
(3/8 and 1/4 inch)) is used to screw the Direct Attached Spigot onto a light stand which ends in a 1/4-20 threaded stud (without needing a separate umbrella adapter).
The unit can also be ordered without any mounting foot (and with or without a single countersunk unthreaded 1/4 inch hole, and flat head screw), for $35. To attach the Horizontal Flash Mounting Bracket to the Lumopro LP633 is also $40 (not including the adapter itself), and I will install it on your LumoPro if it is sent to me, or I can supply the Umbrella Adapter for an additional $40. (See "V Notch and Hole Angle" issues above.)
If you order this item without any mounting foot, and then you can't mount it, or have trouble getting it to fit on your item, you can send it back and I will mount it on whatever you want that you send to me, additional S/H charges and possibly labor charges will naturally apply.
The foam pad is included and attached to each bracket and the Flash Angle Adjustment Screws are an option that adds $10 to the base cost of the bracket. This item is available now, and is truly a working prototype item, not a mass produced, injection molded item.
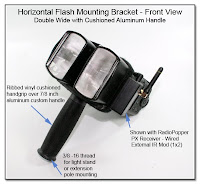
You can now also order the Double Wide horizontal Flash Bracket (PJ1011

PJ1011: Horizontal Flash
Mounting Bracket
Front / Side View) seen in these images (just below).
 The Aluminum Mounting Plate (PJ1095
PJ1095
HFMB: Double Wide,
Double Long, Double Strap with
Aluminum Mounting Plate and image left) is a new mounting option that is now available for all versions of the HFMB. Despite being hand machined with 6 threaded holes, the cost is being kept at only $40 additional to the overall cost of the HFMB. The Double Strap version (called Double Long) will cost $60 additonal to the cost of the HFMB. The 2mm thick foam rubber can be glued in place, or left off entirely. For an additional cost, the aluminum can be powder coated (black or most any other color). The Rigid Umbrella Riser (PJ1102

PJ1102:
Horizontal Flash Mounting Bracket
(HFMB Dbl Wide),
Rigid Umbrella Riser, Spigot Mount) can also be added to get the flash exactly parallel to the long axis of the umbrella.
A2a(***) HFMB Medium Wide for Lastolite EZYBox
CP1104H (PJ1001A) 1-26-11
 This Horiz Flash Mtg Bracket (HFMB) is a specialized Medium size of the normal HFMB (larger than the Single Wide
PJ1001
This Horiz Flash Mtg Bracket (HFMB) is a specialized Medium size of the normal HFMB (larger than the Single Wide
PJ1001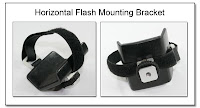
PJ1001: Horizontal Flash Mounting Bracket, smaller than the Double Wide [PJ1011
PJ1101: Double Wide Horizontal
Flash Bracket - Front/Side View] versions), in that it allows the flash to be held in a flat, horizontal orientation, especially for use with the Lastolite EZYBox Mark II Bracket

HFMB Medium Wide for
Lastolite EZYBox
Mark II Bracket (image just below), or any other bracket you choose. This HFMB can be ordered with the normal spigot, locking foot, or umbrella adapter, just as both the
 single and double wide versions can, or it can be ordered with the Reinforced Riser Block shown in these images. Flat head stainless steel machine screws (4 in total) travel the full length of the setup from under the foam pad to the locking foot mount to increase the rigidity of the
  setup having such a long moment arm. The flash body can easily be rotated 90 degrees if desired (left image of composite) so the FlexTT5 antenna points upward, or the display is easier to see. The Safety Ring makes for an easy place to attach the nylon tether (if desired). The image just above shows the range of flash mounting limits using a Nikon SB900, although most often the flash head will naturally be centered in the opening of the Lastolite EZYBox Mark II Bracket.
The Reinforced Riser Block (2.375 inches high, just above), attached with the flat head stainless steel tension screws to the standard locking foot, will add $60 to the base cost of the HFMB for a total cost of $115. A custom sized Reinforced Riser Block can also be fabricated based on your specifications for another type of bracket not shown, just ask.

 Shown in these images (left, right) is the Lastolite EZYBox Mounting Ring and Bracket (original version) that is made of metal. The inner opening is circular, not rectangular as in the newer Mark II plastic version. By turning the metal angle bracket so it is pointing downwards, and replacing the thumbscrew that holds this angle bracket to the vertical support with a low profile thumbscrew ($5), the normal sized HFMB (with the Standard Locking Foot, $40) can be used to hold just about any small flash unit. For even extra adjustment capability, you can have the HFMB made in a Double Long Version with the reinforcing plate, and double Cinch Straps for an additional $40.
 (***) HFMB Medium Wide for Horizontal Format:
Quantum Trio, Canon, Nikon & Others
CP1104H (PJ1001A) 8-24-11
 The HFMB Medium Wide Version is $55 including any of the 3 Foam Spacer Pads, and attached to the spigot or standard locking foot. The attached umbrella adapter adds $40.
  In this image left, the 1/2 inch Foam Spacer Pad is being used to take up some of the slack in the Cinch Strap, and provide extra cushioning for the top surface of the flash. The size of this HFMB, along with one of the Foam Spacer Pads, will also make for a secure mounting for the Quantum QFlash Trio, as well as many other flash units with a flat horizontal dimension of up to 3 inches.
  This image, sent in by Peter at Life Moments Photography of Scottsdale, AZ, shows the QFlash Trio mounted in the HFMB (Medium Wide), using the 1/2 inch Foam Spacer Pad both for added support, and to help take up the slack in the Cinch Strap. The metal ring provides an easy attachment point for a safety strap tether.
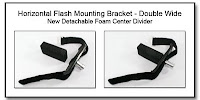
A3(***) Double Wide Horizontal Flash Bracket
PJ1011
Now with a Velcro attached (removable) center foam divider!
Allows center section to be removed during transit and storage.
 SB900 Users:
PJ1011, PJ1011-SB900:
Horizontal Flash Mounting Bracket
(HFMB)
Double Wide & Double Wide-SB900 Due to the thicker than normal size of the SB900, the HFMB needs to be made about 3/4 inch wider, so do make specific note to pass this information along when ordering.
(Double Wide Version only, no additional cost).
 The HFMB Dbl Wide, Long, w/ Rigid Umbrella Riser (PJ1102
PJ1102:
Horizontal Flash Mounting Bracket
(HFMB Dbl Wide),
Rigid Umbrella Riser, Spigot Mount) is both longer (front to back) and wider (side to side) than the normal HFMB Double Wide version. The increased dimensions allow for the Rigid Umbrella Riser to be bolted to the base section.
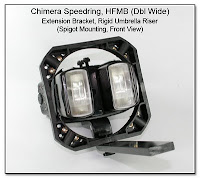
 The HFMB Dbl Wide, Rotating Speedring Mount (PJ1104
PJ1104:
Horizontal Flash Mounting Bracket
(HFMB Dbl Wide), Rigid Umbrella Riser,
Chimera Speedring,
Axial Rotation Bracket,
Spigot Mounting (top view)), makes use of some new components to mount 2 flash units with a center line umbrella mount, as well as mounting to a speedring and allowing axial rotation of the setup from a single mounting point (also see PJ1102
PJ1102:
Horizontal Flash Mounting Bracket
(HFMB Dbl Wide),
Rigid Umbrella Riser, Spigot Mount, PJ1103
PJ1103:
Horizontal Flash Mounting Bracket
(HFMB Dbl Wide), Extension Bracket,
Rigid Umbrella Riser, Spigot Mounting,
Front View).
 The Umbrella Adapter Block & Handle (CP1104G
CP1104G:
Horizontal Flash Mounting Bracket
Double Wide with ABS Umbrella Adapter Block
Cushioned Aluminum Handle
Powder Coated Screw Eye, and Belt Hook) is a new mounting option for the HFMB, and allows a good connection for a monopod, light stand, Cushioned Aluminum Handle, or other 3/8-16 threaded device.
 The Double Wide horizontal Flash Bracket is now also avaliable, and can be seen in these images (just left).
Naturally, these units are meant to hold 2 flash units in this orientation, and a foam spacer pad is used to keep the
 separation between the 2 units. The 1 inch wide strap is situated further forward on the flash head as compared to the Single Wide unit, and one of the flash heads is rotated 180 degrees to provide an opposing flash pattern of the 2 flash heads. This rotation also allows
  the flash units to be placed front to front, so that both sets of controls are facing outwards and in view. All the same mounting options are the same as in the Single Wide version (just above). The Double Wide Horizontal Flash Bracket is currently just $60 with the Mounting Foot or Spigot, or $55 without the mounting foot). This Double Wide Horizontal Flash Bracket, includes the 1 inch wide 18 inch long Velcro strap, and foam spacer. The Flash Angle Adjustment Screws (4) can be added if desired for $15, although light meter tests done and reported by Rob Galbraith's Digital Photography Insights (click here to open article in a new window), seem to indicate these Flash Angle Adjustment Screws might not make a difference in light reflection or transmission with an umbrella. These screws were part of the initial prototype design to allow for the angle adjustment based on the side profiles of different flash units.
Note: If you have previously purchased a Double Wide unit, and would like to upgrade to the new Removable Center Foam Divider
PJ1011A: HFMB
Double Wide Version with
New Detachable Foam
Center Divider (click here for enlarged image), it is just $5 for the shipping costs. The current size of the base is 1.5 x 3.75 inches, and the center divider is 1.5 x 3 inches.
 Another option for the HFMB Double Wide unit is to add a second Cinch Strap to help distribute the load, and as a redundant safety feature. This second Cinch Strap adds $10 to the overall costs, and must be ordered with the HFMB initial order.
 Here the Double Straps are added for use with the HFMB Double Wide unit with the Rigid Umbrella Riser. This setup has the double thick foam on the Umbrella Riser, and is made to better fit the SB-900 flash unit.
(***) HFMB Double Wide, Double FlexTT5
PJ1011A 1-27-11
 When using Nikon flash units, a separate PW FlexTT5 unit is currently needed for each flash. (Canon flash units can be run as 2 flash units from a single FlexTT5.) As seen in the image (left), if the 2 flash units are mounted front to back, and one flash unit is angled just slightly, there will be enough room for a FlexTT5 to be mounted to each flash unit, and for each antenna to be pointing upwards. Adjusting the settings on the inward facing flash unit (the flash which is currently angled slightly), is just a matter of increasing the hinge angle closer to 90 degrees and then exposing more of the control panel, while leaving the flash head held securely by the strap. Notice that the strap is positioned just alightly forward of the hinge button for each flash. As with all the HFMB's, after cinching the strap tight, if there is any relative movement of the either flash, then the strap is not tight enough! The setup, even as shown, will pass the "shake test" if the strap is tight, and then compressing the flash units against the center and bottom foam.
A3a (***) Detachable Foam Center Divider
 These images (top, bottom), show the new Detachable Foam Center Divider which is now supplied on all Double Wide units, is available as an upgrade for previous owners for just $5 S/H, or as a full replacement set for $15. Removing the old foam base is usually the hardest part, as it will tear apart in pieces. Use a
  scraper and then some paint thinner to soften the adhesive, but do not use a solvent like acetone, as it will disolve most plastics. The current size of the base is 1.5 x 3.75 inches, and the center divider is 1.5 x 3 x 0.75 inches.
 If you, or an assistant tends to lose the Detachable Foam Center Divider, have the Flat Nylon Tether added for just $5 additional. The loop can slip around the HFMB, but is loose enough to still allow the foam block to be detached from the Velcro and lay flat for easy packing.


///////////////////////////////////////////////////////////
(***) HFMB Double Stack (2, 3 or 4 Flash Units)
PJ1105 5-28-12


A3aa(***) HFMB (Dbl Wide & Long, 2 Straps) w/ Aluminum Mounting Plate
PJ1095 2-6-11
 Here is a new Mounting Plate for the HFMB. The solid aluminum plate is 5/16 inch thick, and is bolted to the HFMB from the top down using 4 flat head machine screws. There are both 1/4-20 and 3/8-16 threaded holes for mounting this setup onto a threaded stud. The aluminum plate is covered in the rubberized foam for a non-slip surface. The main image shows the Double Wide, Double Long, Double Strap Version, while this aluminum mounting plate is also available for the standard length Single Wide and Double Wide versions of the HFMB. This version was made specifically for being ultra-compact, and redundant (double straps) for a mountain climbing photog, where weight, size, and redundancy were critical. Under normal conditions, the single Cinch Strap is more than sufficient, and not one of these single strap units has ever broken or tossed a flash unit when properly assembled.
The Double Wide, Double Long, Double Strap version of the HFMB is just $75 (just $15 more than the $60 for the standard Double Wide version, PJ1011
PJ1011: Horizontal Flash
Mounting Bracket
Front / Side View, above), and then it is $40 to add the Aluminum Mounting Plate to this version. This extra wide version can also have any of the normal mountings as well (Locking Foot, Spigot, or Umbrella Adapter). The Aluminum Mounting Plate can also be added as the mounting for any of the HFMB's for just $40.
An improved version of the thin mounting block is seen just below: ABS Mounting Block. This style of mounting can be added to any style of the HFMB. The ABS is strong, but very lightweight to make for a good mounting, has steel threaded inserts for wear resistance, and unlike the foam covered version, will not have the foam tear off and need replacement.
SB900 Users:PJ1011, PJ1011-SB900:
Horizontal Flash Mounting Bracket
(HFMB)
Double Wide & Double Wide-SB900 Due to the thicker than normal size of the SB900, the HFMB needs to be made about 3/4 inch wider, so do make specific note to pass this information along when ordering.
(Double Wide Version only, no additional cost).
(***) HFMB Medium Wide with ABS Mounting Block
PJ1095A 5-30-12

 The HFMB with 3/4 inch ABS Mounting Block (image left) has just a single 3/8-16 threaded insert (steel). Double 18 inch Cinch Straps will keep any flash secure, and give you that extra peace of mind, should you overtighten one strap, or the setup falls to the ground. A broken Cinch Strap is likely the least of your troubles should your setup fall. A 3/4 inch thick foam spacer block is shown holding the Canon flash, but other sizes of the spacer block are available if requested. The costs for the 3/4 inch ABS Mounting Block are the same as for the 1/2 inch Mounting Block, but only a single threaded insert is now included with either version.
A3b(***) HFMB Double Wide with Aluminum Handle
CP1104C (PJ1013B)
Here is another mounting for the Double Wide HFMB, made for a photog wanting to easily hand hold a double flash in one hand, while shooting with the other hand. The Custom Cushioned Solid Aluminum Handle with the bottom 3/8-16 thread is $75, and the HFMB Double Wide Version is $60, for a total of $135 for this setup. The

 RadioPopper and flash units are not included in these costs, naturally. You can also have an Umbrella Hole and Thumbscrew added to this handle for an additional $25 (CP1104E
CP1104E:
Aluminum Handle and Cushion Grip
with Umbrella Hole and Thumbscrew
(10 Degree Angled)). Also seen in these photos is the RadioPopper PX Receiver which is firing the 2 flash units via the RadioPopper PX External IR Mod (CP1104B

CP1104B: RadioPopper PX
External IR Mod
1x2 Short Cable
with 2 LED Emitters).
 The image, left, shows a Screw Eye with a nylon Safety Strap attached to the Aluminum Handle, so the entire unit can be stored at any time by hanging it from the loop of the Belt Hook shown. With the Belt Hook on your left side (clipped onto your belt), the entire dual flash unit will then be ready at a moments notice for the left hand to lift the unit off the Belt Hook loop, raise the unit overhead, and direct the light where needed. This Screw Eye, Safety Strap, and Belt Hook adds $20 to the setup as shown ($40 if you want an all black Screw Eye and Belt Hook, image coming soon). Loosen the hex nut, and remove the Screw Eye to gain access to the bottom threads when you want to mount this unit back on a light stand or extension pole.
  The Aluminum Handle & Cushion Grip can have the Umbrella Hole and Thumbnut added as shown. In this case, the hole is drilled at a 10 degree up angle (or any other angle you choose), and adds $25 to the setup. The hole is sized for a 3/8 inch umbrella shaft, but can be enlarged if needed. This handle has threaded mounting holes in the top for the HFMB, and a 3/8-16 thread in the bottom for the Screw Eye and Safety Strap or for attaching this handle to a light stand or extension pole.
The Umbrella Adapter Block & Handle (CP1104G
The Aluminum Handle & Cushion Grip can have the Umbrella Hole and Thumbnut added as shown. In this case, the hole is drilled at a 10 degree up angle (or any other angle you choose), and adds $25 to the setup. The hole is sized for a 3/8 inch umbrella shaft, but can be enlarged if needed. This handle has threaded mounting holes in the top for the HFMB, and a 3/8-16 thread in the bottom for the Screw Eye and Safety Strap or for attaching this handle to a light stand or extension pole.
The Umbrella Adapter Block & Handle (CP1104GCP1104G:
Horizontal Flash Mounting Bracket
Double Wide with ABS Umbrella Adapter Block
Cushioned Aluminum Handle
Powder Coated Screw Eye, and Belt Hook) is a new mounting option for the HFMB, and allows a good connection for a monopod, light stand, Cushioned Aluminum Handle, or other 3/8-16 threaded device.
A4(***) High Speed Sync, Dual Flash, FlexTT5
PJ1087 (OC1016a)
 This image shows the simplest way to mount the FlexTT5 to the Canon 580EX (or 580EX II), and have it control a second flash at the same time as mounted in the $60 Double Wide Horizontal Flash Bracket (item PJ1011
PJ1011: Double Wide
Horizontal Flash Bracket, mounted on the Umbrella Adapter, $40, just above). The OC-E3 w/ Dedicated Hot Shoe (item OC1016

OC1016: Canon OC-E3 w/
Dedicated Hot Shoe
atop Camera End) is used to both mount the FlexTT5, connect to flash #1, and provide a connection point into flash #2. This OC-E3 mod involves adding a dedicated hot shoe onto the top of the OC-E3 and costs $130 (not including the OC-E3 cord). The OC-E3 shown here has also been shortened ($60), but that is not necessary for this dual HSS operation.
Here is the setup procedure, passed along by the photog testers:
1. Use matching flash units
2. Put flash in camera hot shoe, turn on both, repeat w/ other flash
3. Turn off the camera, flashes and Pocket Wizards
4. Setup the dual sync cord to the flashes and the pocket wizard
5. Turn the pw on
6. Turn the flashes on
7. Turn the on camera pw on
8. Turn the camera on
Another photog did some setup testing and here's what he has to say:
"I have thoroughly tested these with different cameras and flashes and found my procedure works the same:"
1. Put the setup together connecting everything, but all turned off.
2. Turn on the flashes
3. Turn on the receiving TT5 and wait for the test flash
4. Press test for another flash
5. Turn on the camera
6. Turn on the transmitting TT5
7. Press test for another flash
8. Have the flashes facing you and take a picture to assure both flash in the image.
Here is yet another photog's setup procedure, and while it is very similar to the setups above, the difference is that he starts the setup having only a single flash in place, making sure it operates correctly in eTTL mode (step 1-6), then turns everything off (step 7), installs the second flash unit (step 8), and turns both flash units back on (step 9-10). Only after both flash units have fully charged does he turn on the FlexTT5, causing both flash units to pre-flash simultaneously (step 11).
If you can't get flash unit 1 to pre flash and display eTTL you may need to reposition the flash in the hot shoe, and reposition the foot assembly in the hot shoe of the FlexTT5. Try sliding the Speedlight in or out a millimeter or so then lock it back in.
Setup for Dual eTTL Flash USing the Dual OC-E3 Cable:
1. Put the Dual Camera OC-E3 Cable on the FlexTT5
2. Put flash 1 in the camera side hot shoe of Dual OC-E3.
3. Turn flash 1 on.
4. After flash 1 charges and is ready, turn on the FlexTT5.
5. Flash 1 should pre flash.
6. Flash 1 should display that it is in eTTL mode.
7. Turn off the FlexTT5 and Flash 1.
8. Put Flash 2 in the extended hot shoe.
9. Turn on Flash 1 and Flash 2
10. After Flash 1 and Flash 2 charge fully, turn on the FlexTT5.
11. Flash 1 and Flash 2 should pre flash simultaneously.
12. Flash 1 and Flash 2 should display that they are in eTTL mode.
13. Press the test button on the FlexTT5 and both flashes should fire.
14. Verify that both flashes still display eTTL. (Not TTL)
Not everyone is getting these same results, even when what appears to be a matched set of flash units are being used. It is possible that slight differences do exist even in matched flash units of the same model, or that constant firmware tweaks are making the results slightly off at times.
580EX II, Radio Transmitter, & Digital Trigger Pulse Issues
Dual Dedicated Canon Hot Shoe - Important Notes
********************************************************
A5(***) Spigot & Hardware: Bushing, Threaded Studs
PJ1013a
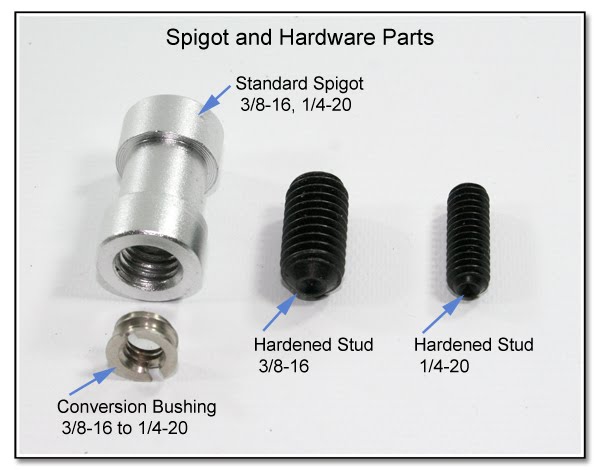 Shown is the Standard "Spigot" that has both the 1/4-20 and 3/8-16 threads for mounting to and into various components like light stands and umbrella adapters. In the image lower left is the Conversion Bushing, an adapter that can be screwed into a 3/8-16 thread and will then allow this end to act as a normal 1/4-20 thread, without having to use a special, hard to find, double 1/4-20 Spigot. This is especially useful as in attaching the Horizontal Flash Mounting Bracket w/ Direct Attached Spigot if your light stand ends in a 1/4-20 male thread.
Also shown in the image are Hardened Threaded Studs of 1/4-20 and 3/8-16 sizes. These can also be referred to as Gender Changers, as screwing one into a threaded insert immediately converts the thread from a female thread to a male thread, and is useful in connecting 2 female threads together, either 1/4-20 or 3/8-16.
Purchase any one item in the image for $5, or the set of 4 (Spigot, Bushing, and 2 threaded studs) for just $15, and you will have a terrific combination of connection items.
A6(***) Pole Mount Angle Bracket for Camera / Flash
PJ1014
 This Pole Mount Angle Bracket is a quick and easy way to mount a camera or flash up and above the crowd using any length readily available extension pole. A small camera can mount directly to the 1/4-20 threaded stud, while a flash unit can mount using any hot or cold shoe with a threaded insert, and then be securely angled using the locking teeth at the pivot point. A neoprene washer helps to minimize the rotation, and any small ball joint can be added for an extra degree of freedom of movement, and rotation. The Pole Mount Angle Bracket as pictured is $50. For a similar device with a built in extension see the next item, the Mini Extendable Monopod. Use a small quick release like the Small Profile Quick Release Assembly or any of these Ball Head Quick Release Units to make it a simple and easy matter to remove the small camera and then even replace it with a flash unit by using a cold or hot shoe mount.
A7(***) Mini Extendable Monopod w/ Ball Head QR:
PJ1015
 This Mini Extendable Monopod is shown with the optional Velbon QHD-41Q Ball Head Quick Release (although any brand's small size assembly can be used). Several different models can be seen just below. The Mini Extendable Monopod will extend from 15 through 30 inches, locking anywhere in between, and ends in a threaded 1/4-20 stud with locknut and lock washer to make for a secure fit into a ball head or other mounting device. The bottom of the cushioned handle has a "broom handle thread" for attachment to any standard extension pole, just like the Pole Mount Angle Bracket. A ThumbNut is available for $5 and is suggested if this is being secured directly to a point and shoot or other small camera. The ThumbNut can be easily hand tightened, although it can not be made as tight as the standard nut and lock washer. The optional Belt Clip is $5. The Mini Extendable Monopod is $55, not including the Belt Clip or ball head assembly. Using the Monopod Belt Pouch makes for easy supporting this Mini Extendable Monopod with two hands on the camera, and the brace point in the pouch.
A8(***) Ball Head Quick Release Assemblies
PJ1016
 These Ball Head QR Assemblies are readily available at most better camera shops, or I can supply the specific one you need, and they run about $50 a set. Additional QR plates are also usually available for about $20.
A9(***) Monopod Belt Pouch
PJ1017 (DF1032)
 This Monopod Belt Pouch is made from a heavy duty nylon, with reinforced seams. It will slide onto a waist belt on either of 2 loops, and will make it easy to hold and support a monopod. The overall size is 4 inches x 8 inches and and sells for just $25.
B(***) Leveling Bracket / Custom Mounting Bracket
PJ1018
 This Leveling Bracket will mount and lock into a camera hot shoe, and allow a magnetic level to be attached to the 4 inch plate for precise leveling in the protrait or landscape formats. This Leveling Bracket is $50, not including the level, which is available at just about any hardware store.
Expanding on this same idea, any number of other items can be mounted to this metal plate, like a cold shoe, or a pair of cold shoes for both an external mic and a movie light.
C(***) AA Replacement Batteries (Dummy Batteries)
PJ1019
 AA Replacement Batteries (Dummy Batteries) are shown here attached to a short 6 inch lead ending in an inline sub-mini jack (any end termination is available, depending on your needs). These Dummy Batteries are often used when making replacement battery packs, and are an easy DIY project starting with a 1/2 inch wooden dowel and some sheet metal screws or special rivets as seen in the set used for the Custom Power Cord for the External Battery. A pair of these Dummy Batteries as shown is available for $30, not including the cable termination. A plug or jack of your choosing on a cable up to 6 feet long is available starting at $20 additional. This particular set was made to provide external power to a MultiMax PW, without having to use the expensive PW-AC-MX adapter, although these Dummy Batteries can be used in any device that uses AA cells as in the Custom Power Cord for the External Battery, as seen below.
D(***) Custom Coiled Rubber Power Cord
PJ1020
 Use this Custom Power Cord along with any 6 volt SLA (Sealed Lead Acid) battery housed in an inexpensive nylon camera case, and you have an easy to put together external power supply for your flash unit. The setup, as pictured is $105, and includes the replacement batteries, disconnect, and rubber coiled cable ending in the connectors that fit the standard lugs of these SLA batteries. The "Dummy" batteries can be purchased alone (using screws for the terminals instead of the smooth top rivets) as seen here.
If you need help in locating a SLA battery and soft case, let me know!
E(***) Aux Turning Collar
PJ1021
 This Aux Collar for the Nikon 10 pin plug is a custom, press fit, 0.75 inch diameter, knurled plastic collar which makes it easier to turn the metal collar, especially in tight spaces, when wearing gloves, or for extra large fingers. The image left shows the Aux Collar on a
 Nikon 10 pin plug in a D300, showing the clearance to the lens release button, and the PC jack. As each collar is custom made and fit, the specific cable does need to be sent to me, or this item can be fit to a new plug end on a new device. This Aux Collar is currently $25 each.
_(***)Aux Collar for ScrewLock PC Plug:
PJ1023

The Aux Collar is a 5/8 inch (0.625 in) diameter knurled edge, easy to turn collar ($25) that makes it a breeze to loosen or tighten the locking collar for the ScrewLock PC Plug, especially in cold weather while wearing gloves. They can also be seen on one of the lengths of the Quad Linked Sync Cords (SC1001

SC1001: Quad Linked Sync Cord
(Coiled Rubber)
4 ScrewLock PC Plugs
to RA Mini Plug) for comparison to a ScrewLock PC Plug without the Aux Collar. These Aux Collars are custom fit to each locking collar, and must be ordered with the Custom Sync Cord, or the cord must be sent back to me for the fitting of the Aux Collar. A similar item is made for the Nikon 10 pin plug and can be seen here (CP1065

CP1065: Nikon 10 Pin Plug w/
Auxiliary Turning Collar
For ease in Turning Lock Ring).
F(***) Flat Bracket Mounting Plate
PJ1024
 The Flat Bracket Mounting Plate attaches to the camera bottom, and will position the Pocket Wizard or flash unit to the left side of the camera and slightly forward of the camera plane. This prevents the attached device from getting in the way of your left hand (right side version also available). As shown, this bracket is $40 with the removable cold shoe. An Off Camera Cord (flash end), or a standard hot shoe can be attached instead of the cold shoe for a wired connection. The thin factory cord can be replaced with a heavier cord ending in a PC or ScrewLock PC plug as needed for a more secure connection.
 G(***) Off Camera Coiled Cords
PJ1025
 This image shows the common Off Camera Coiled Cords, along with a longer replacement cord on top. This longer cord is $40, and nicely extends to over 8 feet. It is a very high quality rubber that extends and retracts very easily. It has a similar feel to that of the current Nikon SC-29 cord.
H(***) Molded Monopole Plugs & Jacks
PJ1026
 These two images show the different Molded Monopole Plugs and Jacks in sub-mini, mini, and 1/4 inch sizes. Most of these connectors are also available so that they can be assembled onto a length of wire as seen in the image just below. It is important that many different names are used for the same connector, so some standardization is needed when trying to
  communicate the ideas for a given project. A JACK is the name given for a female gender of a connector such as appears as items #1, and #2 (top image) whether it is attached to a cable, or mounted to a panel. A PLUG is the name given for a male gender connector as appears in all the items of the second image, again whether it is a straight connector, right angle connector, attached to a wire, or mounted into a panel.
I(***) Knobs (Thumbscrews) for Custom Projects
PJ1028
 These are the various Knob Styles for Custom Projects that are available alone or as part of a custom project. Thread lengths can be custom sized, or a standard length (3/8, 1/2, 3/4, 1, 1.25, 1.50, 1.75, & 2.00 inches) can be used. Most standard sizes are available for $10 for a package of 2 ThumbScrews. The longer lengths (2.25, 2.50, 2.75, & 3.00 inches) are $8 each. To have the threads ground off (all but the last 1/4 inch at the end) to allow easy movement through a threaded hole without falling out adds an extra $5 for the shorter screws, and $10 for the longer screws as in these Long Filed Thumbscrews used in mounting battery packs.
J(***) Mounting Hardware Items
PJ1029
 Some different custom Mounting Hardware Items are shown here: The different ThumbScrew Knobs in the image just above can have all but the last 1/4 inch of threads ground off for $5 for the shorter screws, and $10 for the longer screws (in addition to the cost of the ThumbScrew itself) to allow easy movement through a threaded hole, but still allow a tight capture. This type of screw is often referred to as a "Captive Screw", since once in place, it won't fall out and get lost when loose. The center image shows a Custom Length Slotted SetScrew with an included neoprene washer for $5 which can be used to attach 2 items that both have blind holes. The ideal length is 0.5 inches, although almost any length is available. Most often these threaded items are made from black-oxide coated high strength alloy steel (Rockwell hardness C37-C45) unless plain steel or nylon is specified. The neoprene washer helps to resist twisting, and allows for the proper alignment of the 2 items. The right image shows a Knurled Threaded Thumbnut on a custom length slotted setscrew. The thumbnut alone is $5 and allows hand tightening and locking one part against another, but does increase the overall height by 0.375 inches.
 K(***) Short & Long Double Threaded Stud
PJ1030
 This image shows the relative sizes and dimensions for the Short Stud (0.5 inch) with the included Neoprene Washer, vs. the Long Stud (1.25 inches) with the Double Thumbnuts, and the next image down shows each of these Mounting Studs used to attach a PW to a camera bottom threaded insert. The Short and Long Studs are each $5, and the thumbnuts are $5 each.
 When the Neoprene washer gets compressed, it provides tension to keep the PW from twisting with respect to the camera bottom, and allows the PW to be aligned properly. A rectangluar foam sheet can be used instead of the small washer to provide the same cushioning and anti-twisting effects. The nature of the double thumbnuts allows each thumbnut to lock tight against each item (normally without a washer), but then the PW will be spaced away from the camera bottom by a bit over the thickness of the two thumbnuts, about 0.875 inches in total.
 L(***) Tripod Quick Release Double Blind Mount
PJ1032
A way to mount an item to the camera bottom (or to mount any 2 items back to back through 2 blind holes) is by using a Modified Tripod Quick Release like is shown in the two images below (another way is shown here).

 The left image shows a PW mounted to the camera bottom using a modified small format Tripod Quick Release Assembly. The right image shows some of the detail views. This modified Quick Release Assembly can be used to connect 2 blind threaded holes, or by removing the one custom screw, it can be used in the conventional manner as well. The Modified Quick Release Tripod Assembly is compact, and small in size (2 x 2 x 0.75 inches) and is complete at $75. Another Quick Release type of item is the Dummy Foot with Lock Ring or also known as the Small Profile Quick Release Assembly (shown below).
M(***) Small Profile Quick Release Assembly
PJ1034
 The Dummy Foot with Lock Ring provides a metal mounting foot with a locking ring for items that have a threaded insert, with or without a plastic foot. It can be used to protect the plastic foot from breakage during repeated insertion and removal from a mounting shoe, or be used as a Small Profile Quick Release Assy when combined with a Cold Mounting Shoe. The Custom Fit Captive Screw can easily be removed, but won't fall out and get lost. This Dummy Foot adds only 3/8 inch (0.375 in) to the height of the item it is screwed to. The Dummy Foot with Lock Ring, including the Custom Fit Captive Screw is available for $50, and can be attached to any device having a standard 1/4-20 threaded insert. Closeup part #1 shows the Dummy Foot with Lock Ring attached to the flash end of a Canon OC-E3 Off Camera Cord. A Low Profile Cold Shoe (part #4) is available with the Thumbscrew (part #5) for $25. Extra Custom Fit Captive Screws (part #3) are $12 each, while Thumbscrews are 2 for $10 (additional thumbscrew sizes and head styles can be seen here). Many other Cold Shoe Mountings can be seen here.
Another type of Quick Release Assembly is the Tripod Quick Release (just above), which can be used to mount an item to the camera bottom, to mount any two items back to back, or a a conventional quick release device as well.
N(***) Reduced Shaft Thumbscrew
PJ1035
The Reduced Shaft ThumbScrew and the Slotted SetScrew can be seen below where the Tripod Mounting Ring is being used upside down as an Alternative Flash Mounting Point (images below).


 As indicated in the text above (Mounting Hardware Items), the Reduced Shaft 3/4 inch long ThumbScrew and Neoprene Washer is $10, but the threaded insert of the Tripod Mounting Ring needs to be carefully drilled to be a through hole which you can do yourself, or I can do for $10, since the tripod ring usually comes as a blind (dead end) hole. The Slotted SetScrew and Neoprene washer is only $5 but is harder to adjust and keep it tight than the thumbscrew.
 O(***) Foot Plate for Canon EX Flash
PJ1038 (AS1027)
 The Replacement Foot Plate for Canon Flash Units (580 EX, 550 EX, and 430 EX) is $30, and can be used to repair a broken foot plate for the popular Canon flash units. This replacement foot plate can also be used to refurbish a 580 EX or 430 EX foot assembly being evaluated for a credit or refund. See the the OEM Replacement Notes in the Aux Sync Mods-Flash Units Section. It is an extra $30 to have me replace (or to reset it if you have helped first) the foot plate for the 580EX and the 430EX, and $35 extra for the 550EX. Sorry, but instructions are NOT included.
P(***) Foot Plate for Sigma Flash
PJ1039 (AS1027A)
 Here you can see the Replacement Foot for the Sigma Flash Units (set for Nikon on the left, and Canon, on the right. These foot plates are $30 each and can be used to repair a broken foot plate for the EF-500 Series of Sigma Units. It is an extra $30 to have me replace the foot plate, or to reset it if you have helped first. Even through the Replacement Foot Plate for the Canon Units looks very similar to the Sigma item, the locking ring thread size and index nubs are made differently so they are not interchangable. Sorry, but instructions are NOT included.
Q(***)
Nikon SB-28: This type of foot plate is now available for the Nikon SB-28 flash unit and is $30 each. It is an extra $30 to have me replace the foot plate, or to reset it if you have helped first.
R(***) PW Replacement Foot
PJ1040
 Here is a Replacement Foot for all PW Models that is available for $45, either as a stand alone item, or including the service to replace the broken foot on your unit, which means that you do have to send it in to me. Naturally the PW itself is not included, just the repaired foot. Sorry, but instructions are NOT included.
S(***) PW Metal Foot Mod - Vertical
PJ1041
 The PW Metal Foot Mod (all versions) won't break like the plastic foot plate. The mod is $75, but will be the last foot you ever have to replace on the PW. Unfortunately, it is not a field replace item, and must be sent in to me for the mod. With the metal foot in place, the PW will fit and connect when facing in any direction in the hot shoe, unlike the OEM plastic foot which is sized to connect only when the PW ontrols are facing the photog. This type of metal foot can also be used to orient the PW in a horizontal position as in the image just below: PW Metal Foot Mod Horizontal Setup
Remember, that with any metal foot, this part is now stronger than the next part... it is true that the foot will not break, but it you drop your camera with the PW attached, surely something else will break, and it might be something that costs a whole lot more to fix than a plastic foot plate.
T(***) PW Metal Foot Mod - Horizontal (Original)
PJ1042
 For those of you wanting the PW to sit with a lower profile (horizontal) on the camera, and not in the normal vertical orientation, this mod is for you. The PW Metal Foot Mod - Horizontal Setup is also $75, and the existing plastic foot can be left in place, or is usually removed and covered over to achieve a smaller profile. The metal foot will allow the PW to fit into the hot shoe in any direction (antenna forward or left with the camera horizontal), but with the antenna to the left, the antenna will be pointing downwards when the camera is in the normal vertical mode.
There are 2 new variations for the PW Metal Foot Mod - Horizontal Format, and both will keep the antenna in a more favorable position for RF transmission (the antenna will point to the right when the camera is horizontal, and threfore the antenna will point upwards when the camera is in the vertical position): 1) the PW Metal Foot - Battery Door Version, and 2) the PW Metal Foot - Horizontal Offset Version. The offset will give a larger clearance from the eyepiece to the side of the PW, which is especially useful for Nikon cameras where the hot shoe is closer to the back of the camera.
The flexible antenna needs to be straight for the best results; it can be reset so it points vertically when the PW is sitting horizontally, although this is more a matter of convenience than function, or it can be made removable, as in the mext image below: Removable PW Antenna Mod.
T1(***) PW Metal Foot Mod - Battery Door Version
PJ1084
 The PW Metal Foot Mod-Battery Door Version has the metal mounting foot attached directly to the PW Battery Compartment Door to allow the PW antenna to point to the right when shooting in the horizontal format. When the camera it turned to the normal vertical position, the PW antenna will be pointing upwards, as is usually desired. The PW Battery Door should be taped shut for extra security, and if you should check your specific camera to see whether the back edge of the PW will be bumping into your face, all depending on the distance from the camera hot shoe to the back of the rubber eyepiece. If this setup is too close for your use, or you don't like having to tape the battery door shut, you should use the PW Metal Foot Mod-Horizontal OFfset Version (PJ1086), just below. The existing PW foot can be left in place if requested, although it is usually removed and replaced with a blank plate.
This PW Metal Foot Mod-Battery Door Version will cost $85, will usually take just a day, and will naturally void your warranty on the unit, but will give you a PW that doesn't sit up so high in the sky...
T2(***) PW Metal Foot Mod - Horizontal Offset Ver
PJ1086
 The Horizontal Offset Version of the PW Metal Foot Mod shifts the PW forward to the front edge of the camera hot shoe by adding an extra angle block between the hot shoe and the PW. This is especially useful for those cameras where the hot shoe is very close to the rear of the camera, subjecting you to the eye-poke syndrome. This mod is $115, will usually take just a day, and will naturally void your warranty on the unit, but will give you a PW that doesn't sit up so high or so close to your face...
U(***) PW Antenna Mod
PJ1043
 If you are using an alternative mounting for the PW, as in the Metal Foot Mod (Horizontal or Vertical), or just using tape, Velcro, or the PW Caddy to attach the PW to the flash head, you might be interested in the Removable PW Antenna Mod. The existing modded antenna can screw directly into the new threaded stub, or the RA connector shown can be used to allow the antenna to swivel and be placed in different positions. Little if any difference in the range has been found during testing when using the RA connector. This mod, including the RA connector is $95, and the PW does have to be sent to me for the mod.
The IMPROVED version of this mod is just below as the SMA connection stud is now attached directly to the PCB (printed circuit board) of the PW, instead of having a floating connection. This makes for a much more secure connection, which should last for a good long time.
*****************************************************************************
V(***) PW Antenna Mod - Add'l Info
PJ1044
 Here are additional images of the Removable Antenna Mod, the Horizontal Metal Foot Mod, and the Burst Mode Input Jack Mod (click on any image to enlarge in a new window). The SMA connector (threaded part sticking out of the case) is now more rigidly attached directly to the PCB (printed circuit board) of the PW for added strength, and the top of the PW case has been reformed to make this fit more securely. Using the RA connector, the antenna is more susectible to being broken off, so
 this must be considered based on your normal care and use of the equipment. The Metal Foot is is offset to the side and back of the PW, both to clear the battery compartment, and to keep the PW from poking the photog in the eye. The next 3 images show how the

 PW fits to the camera when in the forizontal format. This setup now takes on the the FreeXwire, Bowens Pulsar units in terms of the comapact format.
I have just heard from the folks at LPA Design, who make the PW's, that they have corrected the "Burst Mode Design Glitch" in the new units of the PW Plus II model. This was never an issue with the older Plus models, or the higher end MultiMax models. This means the hardwired mod as described in the above link will only be needed in older units having a serial number below 61.xxxxx.
*****************************************************************************
W(***) Safety Clip
PJ1050
 The Safety Clip adds $5 and a lot of security to most cables it is added to. It must be ordered when the cable is made, but it will take the strain off the wire and reduce the stress on the plug / jack connection. The Safety Clip is most often used as shown here, but it can be used as seen in the ScrewLock PC Plug to an Inline Mini Jack to secure the ScrewLock Sync Cable to the camera and provide a Quick Disconnect.
X(***) Belt Mounting Clip
PJ1051
 The Belt Clip Mounting uses a modified high quality Belt Clip and Modified Button with a short 1/4 inch threaded stud to screw into the existing mounting insert of the PW, and is another way of mounting the PW along with the PW Caddy or your pocket. The Belt Clip and Modified Button, along with a small rubber washer is available for $40. Additional Modified Buttons are $20 each. The optional Aux Mounting Plate (lower left inset image) is $10 and has an adhesive mounting pad on the back. Different Long Coiled Sync Cords are available with a straight mini plug and Safety Clip on one end, and on the other end, either a Standard PC plug, the ScrewLock PC plug, or a Sub-mini plug. The sub-mini plug is used in connecting to the Aux Sync Jack of a modified flash unit, while the PC plug will connect to a camera PC jack or a flash unit PC jack.
Y(***) Belt Clip Attachment for Battery Pack
PJ1052
 Here the Belt Clip is attached as the Battery Pack Belt Clip. The plate is usually also attached using special screw rivits as well as the epoxy cement, and this mod (to your case) will cost $65. Having the Belt Clip attachment near the top of the pack will allow the pack to hang lower on your waist, and swivel on the attachment point. It is also a easier to to attach and remove the battery pack when on the Belt Clip as opposed to the belt loop in the nylon case.
Z(***) Safety Cable - Preformed Loops
PJ1053
 The Safety Cable with Preformed Loops is $20 as shown. It can be made with the heavier cable for $30, and custom lengths up to 36 inches for the same price. The preformed loops will fit nicely through the strap holders on most cameras. Safety Cables should be used in pairs on each piece of equipment for redundancy, and are not intended for shock loads. Load ratings and warnings are further detailed in the FAQ section.
AA(***) Safety Cable - Snap Hook
PJ1054
 The Safety Cable with Sanp Hook is also $20, and is normally 24 inches long, but can be made up to 36 inches for the same price. Load ratings and warnings are further detailed in the FAQ section.
AB(***) Metal Foot Vivitar 283 / 285 HV
PJ1055
 Metal Foot Vivitar 283/285 HV
Test button, lock collar, PC port
Complete Replacement: $55. Shipping the foot alone is $6 First Class, while return shipping for the entire flash unit is currently $17 Priority.

This unit is available either with a bottom hot contact to fit and sync in a hot shoe as in the upper image, or with a bottom 1/4-20 threaded insert as in the lower image, both for the same price.
AC(***) Metal Foot Vivitar 283 w/ Voltage Limiter
PJ1057
 The same Metal Replacement Foot as shown just above on the Vivitar 285HV is shown here fitted onto the Vivitar 283 Flash unit. Some of these 283 flash units have a trigger voltage of about 250 volts, and this replacement foot assembly has a an included Voltage Limiter Module installed to limit the trigger voltage seen by the camera to less than 12 volts. This Voltage Limiter Module adds $105 to the cost of the Replacement Foot Assembly of $55 for a total of $160 for this service.
AD(***) Metal Foot - Vivitar w/ Voltage Limiter
PJ1058
 This image shows the Replacement Foot Assembly with Voltage Limiter and how the module is tucked into the small confines of the assembly. As the text reads for the image of the Vivitar 283 just above, the Foot Assembly is $55, and the Voltage Limiter Module is $105 for a total of $160 for this item. This Voltage Limiter Module will reduce any input voltage to less than 12 volts that will be seen by the camera.
AE(***) Voltage Limiter Module for Vivitar 283
PJ1059
 The Vivitar 283 has an interchangeable sensor, and here you can see the SC-1 Sensor Extension Cord. What you can't see is that the Voltage Limiter Module has been fit INTO the SC-1 Sensor Extension Cord to reduce the trigger voltage from 250 volts down to a safe 6 volts. The cost for this service is $105.
Note: My Voltage Limiter Module can be fit into almost any small space you can think of...just ask! This will reduce any input voltage will reduce any input voltage to less than 12 volts that will be seen by the camera. Custom items using this module start at $105.
AF Click here for an example of a custom item where the Voltage Limiter Module has been added to the bottom of a Custom Double Shoe that started as a Double Cold Shoe converted into a hot shoe. The possibilities are almost endless!
AG(***) Double PC Plug / Sonia Optical Slave
PJ1060
 Here the Replacement Metal Foot Assembly for the Vivitar 283/285 HV ($40, see above) is shown with the Sonia Optical Trigger ($20), being attached using the Double PC Plug Adapter ($25) (see inset image). In the image, the Vivitar has fired in response to the Optical Trigger seeing the flash that was used in taking the picture.
AH(***) Replacement Foot Canon OCC-2
PJ1061
 The Replacement Foot for the Canon OCC-2 is $10 and is easily replaced in the field or sent in to me. It is held in place by just 3 screws, but care must be taken to not pinch the small wires inside the housing during re-assembly. First Class S/H for this item is $6 (USA).
AI(***) Replacement Foot for Canon OC-E3
PJ1062
 The hard to come by Replacement Foot for the Canon OC-E3 is $25 each, and can be shipped via First Class Mail for $6. A set of 4 screws is available for $1 extra, if needed. Care must be taken to not pinch the small wires during the reassembly, and to not overtighten the screws, which can easily strip the plastic collars in the other half of the assembly. There are actually 2 different styles of this part. One style has an even half circle opening for the strain relief and the cord (type A),
  and the other has a smaller opening with a flat section on one part of the opening, and an internal lock plate (type B). If you need the type with the half circle, it is an additional $5 for me to reshape the opening and remove the internal lock plate to fit the shape needed.
See just below for the Metal Foot Mod for any OCC (OC1049

OC1049 (PJ1089):
Metal Foot Mod for
Canon OC-E3 and all
Off Camera Cords).
AIa(***) Metal Foot Mod for Canon OC-E3
OC1049 (PJ1089)
 To repair a broken foot plate once and for all (for any OCC), the Metal Foot Mod for any OCC will make it almost impossible to break another foot plate. Just like the Metal Foot Mod for PW's, (PJ1041
PJ1041:
Metal Foot Mod for
Pocket Wizard
Vertical and PJ1042

PJ1042:
Metal Foot Mod for
Pocket Wizard
Horizontal), this mod is $60. This does raise the overall height by 0.46 inches (11.8 mm) which then creates a slightly larger moment arm and results in somewhat greater forces being transmitted to the 4 screws holding the 2 parts of the housing together. It then becomes even more important to think about having the small upper rail screws replaced with longer screws and nuts, and then reinforcing the entire assembly with epoxy, as in the Long Screw and Epoxy Mods (OC1014

OC1014: Off Camera Cord
Epoxy Reinforcement
Screw Comparison). The PC jack can be hot wired (tied into the trigger circuit) for an additional $10 if desired, the can be set up to face any direction that is desired (front, left, right or the default back).
AJ(***) Flash Mounting Shoes
PJ1064
 Theses 2 images show various ways of Mounting a Flash to a light stand or other rigid item. Prices for all these items are listed at the end of this section of text (Price Link). Items A) and B) (image left), and item J) (image below) allow the angle to be adjusted, and both A) and B) raise the flash by 1.75 inches, while item J) raises the flash by 2.5 inches. Item C), F), G), and H) are hot shoes. Item C) is a much used item throughout this site and is also seen in the Hot Shoe section and where often times the thin (2mm) cord is custom replaced with a RA Molded Mini Plug. Since the plastic case is held together with screws, when the cord is replaced, the case can be epoxied for strength, or even larger screws are used for reinforcement along with the epoxy as in the Upgraded Kaiser Hot Shoe. Item H) (image below) is similar to item C), except that it is factory sealed without screws, so only the PC plug can be changed, if desired. Items D) and E) are 1/2 inches high to the top of the rails, and raise the flash by only 3/8 inch. Item D) has the insulated cutout (so as not to short any of the data contacts), while item E) has a fully insulated plastic plate.
 Item F) (image left) is a hot shoe with a metal bottom foot, locking ring, and 2 PC jacks on the left and right side, and will raise the flash by about 7/8 inch. Item G) is a hot shoe to HH adapter, and will raise the flash by 3/4 inches. Item H) is a hot shoe similar to C), but only the PC Plug itself can be changed, not the 2mm diameter cord. This hot shoe is factory sealed (glued shut). Item K) is a cold shoe raising the flash by 3/4 inches that will mount in a threaded hole, and the knurled ring will tighten it in whichever direction desired. Item L) is a dummy metal foot that will convert any item with a standard 1/4-20 threaded insert to a shoe mountable item, increasing the height by only 3/16 inch. It is also useful to protect a plastic foot from repeated insertions into a metal shoe. The Hot Shoe Pass Through (below left) has to be fit into another shoe that has the threaded insert to be mounted on a stand, while the Tripod Mount Hot Shoe (below right) does have the bottom threaded insert.
AK(***)
Pricing for Flash Mounting Options A-L
(2 images above & below)
A) Tilting Metal Shoe - insulated cutout....$30
B) Tilting Plastic Shoe - fully insulated......$30
C) Hot Shoe - replaceable thin PC cord......$25
D) Cold Shoe - insulated cutout...............$20
E) Cold Shoe - metal fully insulated..........$30
F) Hot Shoe -locking foot, 2 PC jacks.......$20
G) Hot Shoe - bottom foot to HH jack.......$35
H) Hot Shoe - replaceable PC plug only......$25
J) Tilting Metal Shoe - umbrella mount......$35
K) Cold Shoe - mounts in a threaded hole...$25
L) Dummy Foot - protects plastic foot.......$15
Hot Shoe Pass Through (below left)...........$20
Tripod Mount Hot Shoe (below right)..........$20
Dummy Foot Quick Release (below)............$50
(***)


AL(***) Cold Shoe Modifed to Accept Locking Pin:
PJ1070
 Here the Standard Cold Shoe (like item # D, above) has been modified to allow the locking pin of the newer Nikon flash units to fit and hold securely into the shoe. While Canon flash units also use the lock pin, they tend to hold tight into a shoe by gripping the shoe rails instead of relying on the lock pin. This mod can be added to just about any of the cold and hot shoes shown above, and is just $10, in addition to the cost of the item. Send me a cold shoe you already have, and if it can be modified, the mod will be just $17 each. The alternative is to use a locking type of cold shoe such as this one below that has a recessed center area, but a larger profile, and is available for $20.
 ALa(***) Locking Cold Shoe w/ Recessed Center Area
PJ1071
 This Locking Cold Shoe is milled from a block of aluminum, anaodized, and has a spring loaded locking device to grab tight to the foot plate of any ISO standard flash unit. It has a slightly taller and wider profile than the cold shoe above, and the center section is recessed so avoid any contact with the flash contacts. Like all mounting shoes, the bottom is tapped for the standard 1/4-20 thread for attaching this shoe to a bracket or stand
  using a bolt or thumbscrew. This Locking Cold Shoe is available for $20. (Nikon SB900 will lock in this shoe.) These Locking Cold Shoes are also available with additional through holes (left side of composite image, 15 mm apart) so this item can be bolted down onto a bar with tapped holes. In addition, other holes can be custom drilled and tapped in the bottom face (right side of composite image) to suit whatever type of bracket or mounting is desired (ask for details and costs).
*******************************************************************************
AN(***) Footswitch - lightweight
LT1018 (PJ1073)
 The Foot Switch is $75 with the cable up to 6 feet long, ending in a mini plug. Other cable lengths and connectors are available, just ask!
Additional options include a detachable cable, and attached hot shoe for direct PW connection, as well as several different switch models, and a heavy duty twin foot switch and can be seen in the this posting in the Lens Mounted Trigger Cable Section.
AO(***) Momentary Pushbutton Switches
PJ1074
 These Momentary (ON) Pushbutton Switches have a 1 inch by 7/16 inch body and a threaded stem to mount in a 1/2 inch hole. Three button styles are shown: 1) rounded metal, 2) 1/4 inch flat plastic, and 3) 1/2 inch concave plastic. It is generally $20 to use one of these switches, although the specific custom application will determine the final cost of the project.
 These Momentary (ON) Pushbutton Switches - Slim Profile have a body that is narrower than the mounting hole of 1/2 inch, hence the name "Slim Profile". The red line in the image is indicating the part of the switch that is visible when the switch is mounted in the 1/2 inch hole. It is generally $15 to use one of these switches, although the specific custom application will determine the final cost of the project. I have just secured a number of other momentary switches in different colors, sizes, and styles which will be posted soon (or ask).
AP(***) Momentary Pushbutton Switches - Tactile
PJ1076
 These Monemtary (ON) Tactile PB Switches are currently being used in the Stick-On Triggers, Lens Mounted Triggers, Manual Trippers, and the Strap Trigger Cables. It is generally $15 to use one of these switches, although the specific custom application will determine the final cost of the project. Switches #'s 1, 2, and 5 operate in an axial direction, while #'s 3 and 4 will operate in any direction, axially or at any angle (to the side, front to back, etc)
AQ(***) Upgraded Hot Shoe
HS1002 (PJ1077)
 If you are hard on your equipment, broke the hot shoe, or just want it strengthened before you get it, the Upgraded (Repaired) Kaiser Hot Shoe shown in the top image has larger and longer hardened screws set in epoxy along with a heavier cable. Compare this to the OEM version in the bottom image where the small steel screws are just set into the plastic along with the thin cable. To fit the larger screws, the original holes are countersunk for a flush fit, and the body is epoxied together. This upgrade costs $15 if done when this item is ordered (in addition to the $55 cost of the hot shoe itself), or a minimum of $25 if done as a true after the fact repair. For the Dual Linked Hot Shoes, both Hot Shoes can be upgraded for the total charge of $25.
AR(***) Remote Transeiver Caddy (PW Caddy)
PJ1078
 The Remote Transceiver Caddy (also know as as the "PW Caddy") which is compatible with the PW Plus, Plus II, and the MultiMax units. It is being sold here at $16 for a single unit. It can be shipped in the USA via First Class Mail for $6, Priority Mail for $10, or Express Mail for $30, and naturally I can combine other purchased items to help with the shipping. (For international orders, contact
 me for shipping rates.) Why is this item so good? The pictures should really show it all, but leave the contoured plate of the PW Caddy attached to your PW using the included captive screw, and you will always have a lightweight mounting for your PW. The attached heavy duty elastic can wrap around a light stand pole, flash head, or any other irregular object. Now you don't have to worry about the PW swinging from the lanyard, use any
 Velcro, ball bungees, rubber bands, or gaffers tape! The smartly designed high impact black plastic has rubber non-slip feet to prevent slipping or scratching when placed on your flash head, or any other flat surface. The rounded corners match the outline of the PW case to make it easy to carry around and not catch on everything in your camera bag. If you are tired of the unprofessional look and fuss of the other mounting
 methods, you have to try this, it is just so simple, it works!
Attaching the PW Caddy to the flash head, the sync cord works best at just over 10 inches in length with a RA mini plug as seen here.
To allow mounting of the PW Caddy at right angles to the current setup, additional holes are needed in the case, and a longer heavy duty round elastic is needed. The Custom Modification is available for an additional $10 (image coming soon).
 Here is the new Caddy, version 2 which is made for the new FlexTT5 from Pocket Wizard. It is the same price as the original version, $16, and be shipped via First Class Mail, or Priority Mail as needed.
AS(***) PW Jacket
PJ1082
 The PW Jacket is another nice item from the inventor of the "Remote Transeiver Caddy" (also known as the PW Caddy). It is a way to protect your PW during storage and transit, and currently is being sold for $13.
AT(***)
PJ1083
 Here is a closeup showing the Sonia Optical Slave Trigger ($20) attached to a Vivitar 283/285 HV Foot Replacement via the Double PC Plug Adapter ($25).
AU(***)Speedring with Attached Elinchrome Reflector
PJ1088
 Here is item PJ1088, the attachment of an Elinchrome Reflector to a Chimera Speedring. Normally the combined softbox light unit will be mounted at the heavier component. The reflector has been drilled out to accept the angled flat head through bolts, and the nuts and exposed threads are epoxy covered as a
  thread locker as well as to protect the theads. Send me both components, and for just $50 + S/H they can be aligned and bolted together as shown.
AV(***)RadioPopper PX Mtg Bracket Base (10-18-10)
PJ1090
 This RadioPopper PX Mounting Base will hold either a Canon or Nikon flash in the left side, and the flash specific bracket for the PX Receiver unit in the right side. This is a part that tends to easily break, and is a leftover section from another mod I do, the Quad Fiber Optic Setup (CP1027
CP1027:
RadoPopper PX
Mtg Bracket Mod
Quad Fiber Optic Setup). These extra base sections are available for just $10 each plus $2 S/H (USA).
AW(***)Cinch Strap with Safety Ring (10-22-10)
Safety Ring on Cinch Strap
PJ1091
 When mounting equipment of any kind where there is the potential for it to fall and injure someone, or do other damage, Safety Cables are needed. The Cinch Strap with Safety Ring (Safety Ring on Cinch Strap) can be attached to just about anything you can loop it around, cinching it tight, and the 1.125 inch black split ring is large enough to slip a safety cable through, or attach a snap directly to this ring. The Cinch Strap will hold tight without slipping on most surfaces, but a foam pad is included for extra slippery surfaces. The Cinch Strap with attached Safety Ring is $12 for the 12 inch version, and $14 for the 18 inch version. These are similar to the Holding Bands (CP1030A
CP1030A:
Fiber Optic
Holding Band on
580EX Flash Unit) used in the Fiber Optic Bundle, and Wired IR Emitter Splitters for the RadioPoppers, but the Cinch Strap does not have a pre-punched hole, and the foam strip is not attached, so it can be placed where desired.
AX(***) PW Mounting Bracket-Tripod Collar (12-2-10)
PJ1092
 This PW Mounting Bracket will hold 2 PW's and is shown attached to a Tripod Collar. The bracket itself is made of lightweight, strong, but flexible high density polyethylene covered in weather and fire retardant foam. The 3 Reduced Neck Captive Thumbscrews hold tight and prevent rotations by compressing the foam slightly. This PW Mounting Bracket, including the Thumbscrews, but not the PW's or the Tripod Collar, is $55
AX1(***) Double Cold Shoe (7-2-13)
PJ1092a

AY(***) RP JrX Transmitter Flash Head Mounting: Removable Velcro / Foam Spacer Block (12-2-10)
PJ1093
 The RadioPopper JrX Transmitter can sit in the camera hot shoe or connect via sync cord, and then fire up to 3 zones off camera flash units. The Studio version even allows the manual adjustment of the power output for each of these zones. If you want to have an on camera flash unit as well, this Foam Spacer Block will
  allow a Velcro attachment of the uneven bottom of the JrX Transmitter to any flat surface, but still allow the JrX Transmitter to slide into the camera hot shoe when desired. This Foam Spacer Block, cut to fit the nooks and crannies of the JrX Transmitter bottom, covered in Velcro, along with the Velcro for the JrX Transmitter bottom and the mounting on the flash head is available for $55.
(***) RadioPopper JrX Cube Mounting Block
PJ1093A (8-2-11)
 While the JrX "Cube" has a bottom foot with a threaded insert, and is perfect for mounting on a light stand or into another cold shoe, this little Mounting Block can sit flat on a flat surface, or be attached to a threaded stud using the 1/4-20 threaded insert. The recessed topside mounting makes the JrX sit as low as possible on the Mounting Block. With the JrX Receiver attached to the flash head using Velcro, and an extra short 3 conductor sync cord, you have an easy to position setup that can even be stored already assembled for an ultra fast deplayment. This Mounting Block is just $35, including the thumbscrew and threaded insert. A shortened 3 conductor RA-RA sync cord is also $35, and helps to make this a neat and compact setup.
AZ(***) Monopod Tilt Head w/ Custom 3/8-16 Bolt
PJ1094 2-4-11
 The Monopod Tilt Head (Manfrotto 234) is a heavy duty, cast tilt head with just a single degree of freedom (one axis of movement: tilt). The existing double headed bolt (1/4-20 and 3/8-16) is fine for most items, but sometimes you need extra length of the heavy duty 3/8-16 threads. This Custom Fit Longer 3/8-16 Bolt has a ground head to fit into the smaller than normal recesses of the plastic locking ring. Making this Custom Longer Length 3/8-16 bolt to fit this Monopod Tilt Head is $35.
(***) Quantum 4, 4i Mounting Bracket
PJ1105 8-7-14
 While the Quantum 4 and 4i Radio Receivers are not a new item, they still work quite well, and have a loyal following among many photogs. The biggest complaint for many brands of radio receivers is that there just isn't a good way to rigidly mount the radio receiver to a light stand or horizontal bar. This Custom Mounting Bracket is held to the Quantum 4 and 4i using self stick Velcro along with a foam pressure pad. The grooves of the Custom Mounting Bracket

 along with the multi-use clamping bracket allow the device to be secured to either a vertical or horizontal tube or plate with just a simple adjustment of the threaded nut and replaceable threaded stud. You can even use a short threaded stud and attach a Super Clamp in place of the existing multi-use clamping bracket. It is just $55 to make this Custom Mounting Bracket as shown. This method of making a custom mounting can be sized for such things as the Quantum Turbo, Vagabond Mini Lithium and other brands of battery packs or for almost anything you can imagine...just ask.
PJ1105

PJ1105
Quantum 4, 4i
Mounting Bracket---Quantum 4, 4i Mounting Bracket 8-7-2014
BA(***) CyberSync Receiver Mounting Bracket
PJ1097 9-2-11
 While each of these CyberSync Receiver Mounting Brackets are currently hand molded and finished, they still hold and mount the CyberSync Receiver in an easy and secure clip-in method, and then the assembly can be mounted to a flash head using the included 12 inch Cinch Strap or to a light stand or bracket using the 6 inch Self Stick Strap. The concave recess on the back surface will aid in positioning
  this bracket on a light stand or other object. The optional Rigid Attachment Pad (image coming soon) is attached using the Self Stick Strap, and provides a 1/4-20 threaded hole for mounting the assembly using a thumbscrew. An option is also being developed to include a threaded insert and additional strap slots in the foot of the bracket. Currently, the CyberSync Receiver Mounting Bracket is $50 each. Extra Cinch Straps (12 inch), or Self Stick Velcro sections (6 inch) are $6 each. The regular Cinch Strap (PJ1091
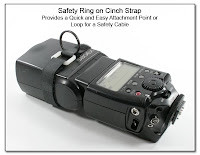
PJ1091:
Cinch Strap with Safety Ring:
Quick and Easy Attachment Point or
Loop for a Safety Cable) is $12 for the 12 inch version, and $14 for the 18 inch version.
BB(***) CyberSync Receiver Simplified Mounting
PJ1098 9-6-11
 This CyberSync Receiver Simplified Mounting uses a precision slot cut in either side of the CyberSync case, making room for a Self Stick Strap or Cinch Strap to be slid through the battery compartment for a secure mounting strap. A section of foam on the back of the CyberSync Receiver unit helps to stabilize the unit and prevent slipping. Currently, the CyberSync Receiver Simplified Mounting is $30 each, including the Self Stick Strap and Foam Back Pad. Naturally, you do have to send the CyberSync Receiver to me for this mod.
 BC(***) CyberSync Receiver with Nylon Lanyard
PJ1099 9-6-11
 Who said there was no way to hang or mount the CyberSync Receiver? Here a Custom Length Nylon Lanyard has been added to the CyberSync Receiver unit. Also seen in the image is the Precision Slot that has been cut into the side of the CyberSync Receiver for the Simplified Mounting using the Self Stick or Cinch Strap. This CyberSync Receiver Nylon Lanyard will cost just $25 when done alone, or $20 when 2 or more are done together. This is not a field installable item, and S/H is not included. Several units can be sent for the same $10 using Priority Mail (USA).
 BD(***) CyberSync - Elastic Cord & Brass Hook Mod
PJ1100 9-8-11
 The last in the series of mountings for the CyberSync Receiver is the Elastic Cord & Brass Hook Mod. Instead of a single sided soft nylon Lanyard (just above), a length of heavy round elastic cord is used to either act as a hanging loop, or to secure the CyberSync to just about any object. The elastic is then be secured on the small brass hook embedded into the bottom of the case. Either a section of
  rubber foam strip or a piece of soft Velcro is applied to the battery door of the CyberSync Receiver unit to help stop slippage as the elastic is holding the CyberSync unit in place. Using a double twist in the elastic allows the CyberSync Receiver unit to be attached to a vertical pole like a light stand (image left). Stretching the elastic directly around an object will allow mounting the CyberSync Receiver unit on a flash head (image below), or other object like a bracket. Again, this Elastic Cord & Brass Hook Mod is not a field installable item, and the CyberSync Receiver unit must be
  sent in to me. The cost of this mod is $40 each, S/H is not included.
BE(***) Dummy Battery Cable: Quantum to NP-Fxxx
(Camcorders & Other Devices Using 7.4 volt Lithium Battery Packs)
PJ1101 9-21-11
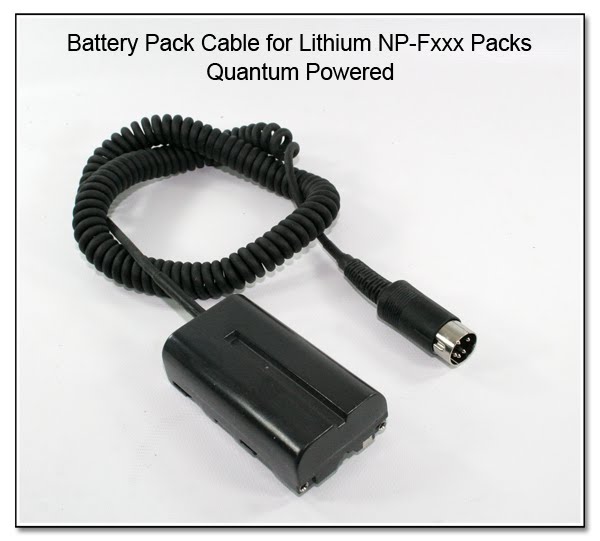 The NP-Fxxx is a series of Lithium Battery Packs used to power many items like camcorders, and in this case specifically the Hassleblad CF39 Digital Back. This image (left), is a NP-F550 Lithium Battery Pack that has been modified into a Dummy Battery Pack to supply external power to the device. In this case the cable will connect to the Quantum Turbo Battery Pack. This conversion is $140, not including the battery shell (plastic case) that fits your specific device. Any old or generic battery pack that will fit your device can be used for this purpose. For added versatility, a disconnect can be added into the line, or directly into the Dummy Battery Pack, for just $55. This disconnect would then allow a way of connecting other external power supplies to your setup. Using the same battery case to fit your existing device, a Dummy Battery Cable can be made using the AA Emergency Pack, Tekkeon Battery Pack, or even any of the SLA or LiPolymer Hi-Capacity battery packs.
 For various other external power supplies, see the Leica DMR Accessories & Mods Section.
BF(***) HFMB Dbl Wide, Long, w/ Rigid Umbrella Riser
PJ1102 10-01-11
This newest version of the HFMB - Double Wide is both longer (front to back) and wider (side to side) than the normal version PJ1011. The increased dimensions allow for a foam covered Rigid Umbrella Riser that is bolted to the base HFMB, and has a straight through umbrella hole that is centered between and parallel to the centerline of the 2 flash units, as seen in this image. The increased length allows for a greater back and forth adjustment of the flash  units within the bracket, and allows for a double nylon thumbscrew to secure the umbrella shaft without scratching the metal. A single Cinch Strap is still used, and the mounting onto a spigot (shown), locking foot, or umbrella angle adapter is available. With the Rigid Umbrella Riser attached, this HFMB does take up more room than when the Detachable Foam Center Divider is
  used, but then there are also no extra pieces to lose.
While this HFMB (Double Wide) is still $60, the attached foam covered Rigid Umbrella Riser with nylon thumbscrews, and slotted machine screws is $55 additional. Due to the longer width and length as compared to the normal version of the HFMB, the foam covered Rigid Umbrella Riser is not available as a retro fit, or a field installable item.

 This version of the HFMB Double Wide with Rigid Umbrella Riser can be mounted on the Standard Locking Foot for just an additional $5 (image left). Extra reinforcement is needed to make the Standard Locking Foot fit securely with the Rigid Umbrella Riser. Because of the larger size of the HFMB with the Rigid Umbrella Riser (spigot or Standard Locking Foot mounting), the S/H is often slightly higher than the HFMB versions without the Rigid Umbrella Riser.
 Another mounting option for the HFMB is the ABS Mounting Block, which adds $55 to the overall cost. Shown in this image, is the HFMB with the Rigid Umbrella Riser, Second Cinch Strap, and the ABS Mounting Block with the 3/8-16 steel threaded insert.
 With the HFMB mounted on a spigot, any umbrella holder / angle adapter can be used for mounting to a light stand. Having the Rigid Umbrella Riser allows the placement of an umbrella directly centered between the flash units, as shown by the placement of the 3/8 steel rod (image left).
Notice that in the image, the umbrella adapter is mounted upside down (hole of the umbrella adapter is in bottom section). This will allow this hole to be used for mounting a battery pack holder, as seen in this image below, and in further details in the
 posting here (in the Dual Flash Section). Having the battery packs rigidly mounted and along the centerline of the flash stand makes for a more secure mounting, and one that is less prone to tipping, as compared to having the battery packs loosely hung on the light stand or umbrella adapter. Extra mounting holes are included, both threaded and unthreaded, so that other types of battery packs can be attached as needed.
 Thanks to Mark W (www.markwallheiser.com) for this example (image left) of how centered and even the light pattern is when the umbrella is used with this Rigid Umbrella Riser attached to the HFMB.
 BG(***) HFMB Dbl Wide, Speedring Mounting
PJ1103 10-01-11
The HFMB Double Wide version can be used to mount 2 flash units into a Chimera speedring as seen in these 2 images (left, and just below). This Chimera speedring shown has an internal opening of 5 7/16 inches (138 mm), and the dual flash setup shown is using the Rigid Umbrella Riser of item PJ1102PJ1102:
Horizontal Flash Mounting Bracket
(HFMB Dbl Wide),
Rigid Umbrella Riser, Spigot Mount (just above), for reasons specific to this project. The photog wanted one setup to hold the 2 flash units, and mount a parallel umbrella, but also be able to attach
 this same unit to a speedring for his softbox when needed. If the standard foam center divider is used with the HFMB Double Wide (PJ1011) is used, an even smaller opening of speedring can be used. The Extension Bracket is currently shown in an untrimmed form, but for this setup, it would be trimmed just in front of the second set of mounting holes. Left longer, other mounting holes, threaded or unthreaded can be added, only limited by your
  imagination. The trimmed Extension Bracket can be mounted to any single or double HFMB, with or without the Rigid Umbrella Riser, and can likely made to fit just about any speedring or other item.
The trimmed Extension Bracket, made of the same high strength ABS as the HFMB itself, including the mounting bolts needed for both the HFMB and speedring, is $55. Naturally, each Extension Bracket is custom made to the exact specifications needed, so the speedring is needed for fitting everything correctly. For medium to large softboxes, an Auxiliary Ssupport Bracket ($15, not shown) would be added to secure the top of the speedring and minimize flexing of the entire setup.
Update: 5-15-15 An updated version of the Extension Bracket for mounting the HFMB using upper and lower mounting brackets is shown just below.
BH(***) HFMB Dbl Wide, Rotating Speedring Mount
PJ1104 10-01-11 Updated: 5-14-15
 When the HFMB Double Wide version with the Rigid Umbrella Riser (PJ1102
PJ1102:
Horizontal Flash Mounting Bracket
(HFMB Dbl Wide),
Rigid Umbrella Riser, Spigot Mount, just above), is mounted to a speedring using the Extension Bracket (PJ1103
PJ1103:
Horizontal Flash Mounting Bracket
(HFMB Dbl Wide), Extension Bracket,
Rigid Umbrella Riser, Spigot Mounting,
Front View, just above), the usual mounting is using a spigot directly under the HFMB. Using the new Axial Rotation Bracket, the spigot end can be gripped in the top of a light stand adapter, and the long end is fit through the parallel umbrella hole in the Rigid Umbrella
 Riser, and then locked in place using the acorn nut. This will allow a rotation of the entire speedring setup around the centerline of the flash units...also referred to as "axial rotation". The specific angular position of the setup is then locked in place using the dual thumbscrews of the Rigid Umbrella Bracket. Since the softbox is now even further offset from the light stand mounting point, creating an even greater moment
  arm, care should be taken to stabilize the light stand with dead or live weights to prevent an unbalanced load from then toppling the setup.
This Axial Rotation Bracket, acorn nut, and spigot to fit the Rigid Umbrella Riser is $55. While not normally needed, a stop pin ($5) can be added to the Axial Rotation Bracket to prevent the assembly from sliding along the length of the metal bar.
 This metal SpeedRing has the same ID dimensions as the plastic Chimera above, but this setup of the HFMB has rigid attachments to both the top and bottom of the SpeedRing, and is the new standard route of attachment. Specifically, this setup consists of the HFMB Double Wide ($60) with the
 Rigid Umbrella Riser ($55), Pinned, Locked Spigot with Double Cinch Straps ($45), and Upper and Lower SpeedRing Attachment Brackets ($70). An extra Reducing Bushing ($5) is used for this SpeedRing to allow either of the upper threaded holes to be used as attachment points with the 1/4 inch thumbscrew. While the Reducing Bushing makes it possible to use this SpeedRing without any alterations, for an additional $35, the upper 1/4 inch hole can be re-drilled and re-tapped so that all 4 threaded holes are now the same at 3/8 inch, and both thumbscrews will be the same 3/8 inch. The large lower knob will
 tend to interfere with the rotation of some Angle Umbrella Adapters, so most times, a second threaded spigot ($10) is inserted into the bottom of the pinned spigot shown.
--------------------------------------------------------------------------------
Plugs / Jacks / Cables / Repairs
As most everything on this site is a custom item, many of the things in this post also appear in other areas. Should you see something of interest, but wish it were just a little bit different, send me a note to discuss it, as many times that's where the next picture will come from!
--------------------------------------------------------------------------------
Purchase Info: Please Read


0 comments:
Post a Comment